An Audacity scary voice starts before the Effect menu, with a clean, dry recording. Audacity is a free, open-source editor and a good place to learn what each stage of a scary voice chain does. Demons have their own walkthrough in how to make a demon voice; this page covers the other classic scary voice types.
Before you start
- Write the line first. A short, present-tense line with one concrete detail makes any scary voice work harder than an extra effect does.
- Record dry. Every recipe below starts from a quiet, soft room and a close microphone. You can add space later, never remove it.
- Work on a copy. Press Ctrl+D (Edit › Duplicate) before anything destructive.
- Preview first. Effect dialogs have a Preview button; listen before you apply.
- Keep the order. Pitch, filters, distortion, then echo or reverb. Distortion after reverb turns the tail into fizz.
Which Audacity? The paths below come from the Audacity 3.7 manual. Audacity 4.0, released in September 2026, writes its menus in sentence case, and its manual (checked in November 2026) lists no Distortion, Echo or Change Speed and Pitch effect. If one of them is missing from your Effect menu, you are probably on 4.0.
The menus you will use
- Effect
- Change Pitch
- Audacity 3.7 menu path
- Effect › Pitch and Tempo › Change Pitch
- Controls used here
- Semitones (half-steps), Percent Change
- Effect
- Change Speed and Pitch
- Audacity 3.7 menu path
- Effect › Pitch and Tempo › Change Speed and Pitch
- Controls used here
- Speed Multiplier (older releases call the effect Change Speed)
- Effect
- High-Pass Filter
- Audacity 3.7 menu path
- Effect › EQ and Filters › High-Pass Filter
- Controls used here
- Frequency (Hz), Roll-off (dB per octave)
- Effect
- Low-Pass Filter
- Audacity 3.7 menu path
- Effect › EQ and Filters › Low-Pass Filter
- Controls used here
- Frequency (Hz), Roll-off (dB per octave)
- Effect
- Bass and Treble
- Audacity 3.7 menu path
- Effect › EQ and Filters › Bass and Treble
- Controls used here
- Bass (dB)
- Effect
- Distortion
- Audacity 3.7 menu path
- Effect › Distortion and Modulation › Distortion
- Controls used here
- Distortion type, Drive, Distortion amount
- Effect
- Tremolo
- Audacity 3.7 menu path
- Effect › Distortion and Modulation › Tremolo
- Controls used here
- Waveform type, Wet level (percent), Frequency (Hz)
- Effect
- Compressor
- Audacity 3.7 menu path
- Effect › Volume and Compression › Compressor
- Controls used here
- Threshold, Ratio
- Effect
- Echo
- Audacity 3.7 menu path
- Effect › Delay and Reverb › Echo
- Controls used here
- Delay time (seconds), Decay factor
- Effect
- Reverb
- Audacity 3.7 menu path
- Effect › Delay and Reverb › Reverb
- Controls used here
- Room Size, Reverberance, Tone Low, Wet Gain, Dry Gain, Wet Only
- Effect
- Reverse
- Audacity 3.7 menu path
- Effect › Special › Reverse
- Controls used here
- No settings
- Effect
- Noise
- Audacity 3.7 menu path
- Generate › Noise
- Controls used here
- White, Pink or Brownian; Amplitude from 0 to 1
- Effect
- Silence
- Audacity 3.7 menu path
- Generate › Silence
- Controls used here
- Duration
- Effect
- New track
- Audacity 3.7 menu path
- Tracks › Add New › Mono Track
- Controls used here
- Shortcut Ctrl+Shift+N
Audacity 3.6 replaced the Compressor with a new design; from 3.6.2 the old one sits in a Legacy group. The numbers below are starting points taken from the matching effects in our studio, so adjust each scary voice by ear.
Ghost voice
The ghost is the thinnest scary voice in this guide: no low end, more room than voice, and a faint second voice that is not quite in tune.
- Thin it out. High-Pass Filter at about 460 Hz, then Low-Pass Filter at 7,000 Hz to soften the consonants.
- Make the double. Duplicate the track. On the copy, use Change Pitch with a Percent Change of 1.2, roughly a fifth of a semitone sharp. Drag the copy about 45 ms later and set its gain about 6 dB below the main voice.
- Drown it. Select both tracks and apply Reverb with a high Room Size and Reverberance, Tone Low turned down so the tail stays thin, Wet Gain at 0 dB and Dry Gain around −6 dB.
- Sag it slightly. Optional: Change Speed and Pitch with a Speed Multiplier of 0.976 on both tracks, under half a semitone down.
This is the target, the studio's Ghost effect at 60%:
Monster voice
A monster is big and rough but close: breathing in the same room, not calling from a cathedral.
- Lower it. Change Pitch at about −5 Semitones, with Use high quality stretching ticked for a cleaner large shift.
- Add chest. Bass and Treble with Bass at +6 dB. The manual describes Bass as a low shelf with its half-gain point at 250 Hz.
- Add rasp. Distortion, type Hard Overdrive, with a moderate Distortion amount. Follow it with a Low-Pass Filter near 5,000 Hz to tame the fizz.
- Add a rattle. Tremolo with a sine Waveform type, Frequency around 30 Hz and Wet level around 30%. A fast, shallow wobble in volume reads as a throat that rattles.
- Keep it close. Reverb with the Small Room Dark preset, mixed low.
If this scary voice sounds far away on playback, lower the Reverb mix before you touch anything else.
For a ready-made creature, the monster voice generator starts from the Revenant voice with the Demon effect.
Creepy whisper
For a creepy voice, Audacity needs surprisingly little: a whisper that is too close and seems to come from more than one mouth.
- Record three takes of the same whispered line, each on its own track, mouth close to the microphone.
- Clean the low end. High-Pass Filter at about 150 Hz on each take to remove breath thumps.
- Lift the detail. Compressor with a low Threshold and a moderate Ratio, so soft consonants come forward.
- Spread them. Slide the takes 20 to 60 ms apart and pan one left and one right with each track's pan slider.
- Add a cellar. Duplicate the centre take, Low-Pass Filter the copy at 2,200 Hz, then apply Echo to the copy with a Delay time of 0.33 seconds and a Decay factor of 0.4. Pull the copy well under the dry takes. Echo has no tone control, so the filter is what makes the repeats sound distant.
Record the whispers in short sets and rest between them; a tired throat makes this scary voice rough instead of close.
Old radio voice
The scary voice of analog horror broadcasts: a narrow band, hard grit, flat dynamics and hiss.
- Narrow the band. High-Pass Filter at about 530 Hz and Low-Pass Filter at about 2,900 Hz, both with a steep Roll-off.
- Break it. Distortion with Hard Clipping and a little Drive, or Soft Overdrive for a gentler crunch.
- Flatten it. Compressor with the Threshold at −24 dB and a Ratio of 8:1, the same as the studio's Analog effect.
- Add hiss. Tracks › Add New › Mono Track, select the length of the voice, then Generate › Noise: White, Amplitude around 0.03. High-Pass it at 2,000 Hz and Low-Pass it at 3,000 Hz so it hisses rather than roars.
- Slow the tape. Change Speed and Pitch on the voice with a Speed Multiplier of about 0.96.
For scripts and mixing, see the analog horror voice guide.
Reverse reverb, and a fully backwards voice
Reverse reverb makes each word swell out of nothing, as if the room heard it before you did.
- Click at the very start of the track and use Generate › Silence for 2 to 3 seconds. The swell needs that room.
- Duplicate the track.
- On the copy, apply Effect › Special › Reverse.
- Still on the copy, apply Reverb with a large Room Size, high Reverberance and Wet Only ticked.
- Reverse the copy again. The reverb now rises into each word instead of trailing after it.
- Balance the copy against the dry track, or mute the dry track for a scary voice made only of its own echo.
For a fully backwards voice, like the studio's Reverse effect, skip the copy: reverse the dry track itself and add an ordinary Reverb. The rhythm still sounds like speech, so the ear keeps trying to decode this scary voice and never can.
Demon voice
The demon is the heaviest scary voice of all: it adds an octave-down double and a long, dark hall to the monster chain. How to make a demon voice has the Audacity, DaVinci Resolve and Premiere steps.
Fixing common problems
- Red clipping lights. The manual's fix: Effect › Volume and Compression › Amplify with a negative Amplification.
- Muddy or blurred. If a scary voice turns to mush, lower the Wet Gain first, then raise the High-Pass Filter or ease the pitch shift.
- Tracks drift apart. Change Speed and Pitch changes the length; apply it to all tracks at once.
- Not scary enough. Before adding more effects, slow the delivery and shorten the line. A scary voice comes from pacing as much as processing, and pushing every effect to its maximum only blurs the words.
No install? The same chains in your browser
Rather not build chains by hand? The studio at AI Scary Voice runs comparable ones in your browser.
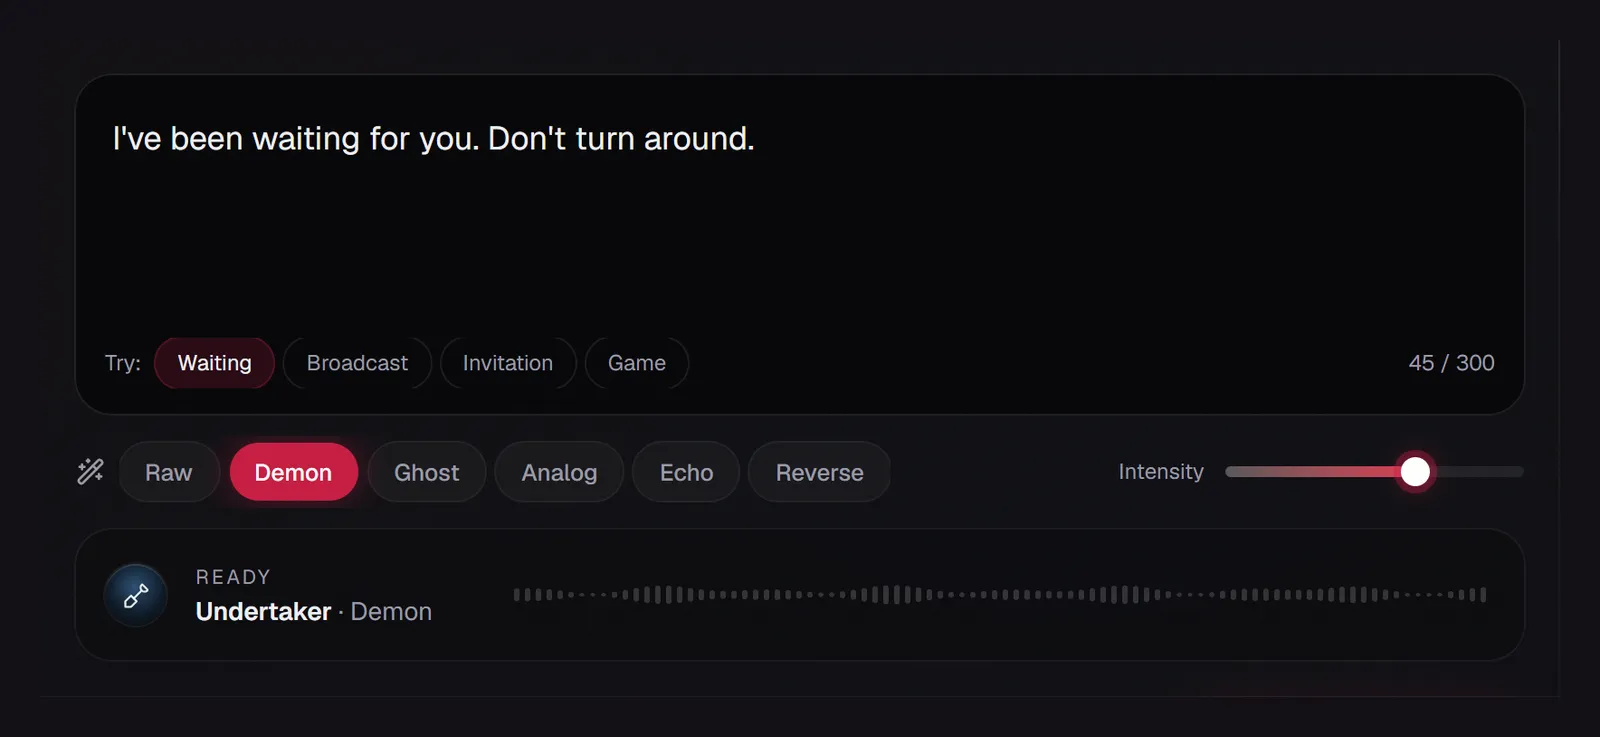
- Open the Voice changer tab. Record up to 60 seconds with your microphone, or upload an MP3, WAV, M4A, OGG or WebM file of up to 3 minutes and 25 MB.
- Pick an effect and set the intensity. Switching is instant and costs nothing.
- Play it back and download the scary voice as a WAV with the effect built in. You can keep editing it in Audacity.
It is free, needs no sign-up, does not use the daily free generations, and never uploads your recording. It is not a live voice changer, so it will not work in calls or game chat.
- Audacity recipe
- Ghost voice
- Closest studio effect
- Ghost
- Audacity recipe
- Monster voice
- Closest studio effect
- Demon
- Audacity recipe
- Creepy whisper with a cellar echo
- Closest studio effect
- Echo
- Audacity recipe
- Old radio voice
- Closest studio effect
- Analog
- Audacity recipe
- Fully backwards voice
- Closest studio effect
- Reverse (reverse reverb has no direct match)
One voice through four effects
Nothing to record? The Text to speech tab reads your line in a preset scary voice, with 3 free generations a day of up to 300 characters. The scary voice changer opens straight on the Voice changer tab.
FAQ
Can Audacity change your voice?
Yes, on a recording. Audacity is an editor: you record or import audio, then apply effects to it, such as the scary voice recipes above. It is not a live voice changer for calls or streams.
How do I make a ghost voice in Audacity?
Cut the lows with a High-Pass Filter around 460 Hz, add a slightly sharp copy about 45 ms late, then a big Reverb with the Wet Gain above the Dry Gain.
How do you do reverse reverb in Audacity?
Add a few seconds of silence at the start, duplicate the track, Reverse the copy, apply Reverb with Wet Only ticked, then Reverse the copy again.
How do I make a robot voice in Audacity?
Use Effect › Distortion and Modulation › Vocoder. It needs an unsplit stereo track with the voice in the left channel and a carrier, typically white noise, in the right.
Why can't I find Distortion or Echo in Audacity?
You are probably on Audacity 4.0. Its manual, checked in November 2026, lists Delay rather than Echo and no Distortion effect. The scary voice recipes here use Audacity 3.7.